


Hey, Outreachers!
If you've been managing outreach campaigns for a while then you might know it goes way beyond emails.
Emails help us communicate but our websites help us convert prospects for the most part.
The best thing about a website is it doesn't need much input from us.
You just have to set it up once and then it'll welcome visitors from your social media, blogs, organic referrals, etc.,
The problem is there might be new visitors who are not already there in your pipeline.
These new visitors are interested in your product but they may leave your site anytime. You need to speak to them, know them, and get their contact information before that happens.
You can employ sales agents and give them a salary for chatting with your visitors to capture their contact information...
Or you can install a chatbot on your site that captures leads 24/7 for you. It's scalable and when you sign up for Hatrio Sales it comes included with your package.
Now, let's see how you can install a chat widget on your site.
Signup if you haven't already
Getting started with Hatrio Sales is easy.
You can get started right now in one step. All you have to do is sign up and that only takes a minute, no credit card or billing required 👉 Sign up now.
Once you're inside the dashboard, you'll find every product you need to upgrade your sales workflow in our suite.
Navigate to "Create chatbot" under Chatbot
Chatbots category is a fully featured product included in your subscription. You can set up, manage, and collect leads from your website and view them here.
For this post, we'll create a chatbot using the "Create a chatbot" button under the Chatbots category.

A: Find leads and responses collected from the past chatbots
B: Start configuring a new chatbot for your website
C: Preview the chatbot that you're building; you can edit the scripts and scenario to get your desired output
After creating a chatbot you can configure its looks to match your branding and what actions it can perform on your site.
Style your chatbot with colors, avatars, and text customization
Let's start with how to style your chatbot to give it a unique look and feel.
After creating your chatbot, you'll find a preview tab that displays the image above 👆
In the image above, you can see different layouts such as Widgets, Embeds, and Standalone links. Feel free to explore these different layouts
Name your creation for easy identification and organization
Adjust the position or color based on your branding preference with HEX codes. Feel free to select from our preset colors as well
Set up your widget's avatar. This will be the first thing your visitors will see on the widget, so this can be your brand logo or a picture of the founders
You have a range of triggers and customization for the widget. In the example screenshot above, I have set up triggers, given my name under agent names, and edited the header text. Feel free to follow the same model for your business.
You can also configure where the chatbot is displayed. This setting allows you to display the widget only on matching URLs. This is handy if you want to display the widget only on certain landing pages where collecting leads is necessary
Configure chatbot flows
Now that you have styled your widget, you need to build the chat flows that your visitors will be getting. This will help you configure what actions are needed to be taken by the bot when chatting with a visitor. Let's see.
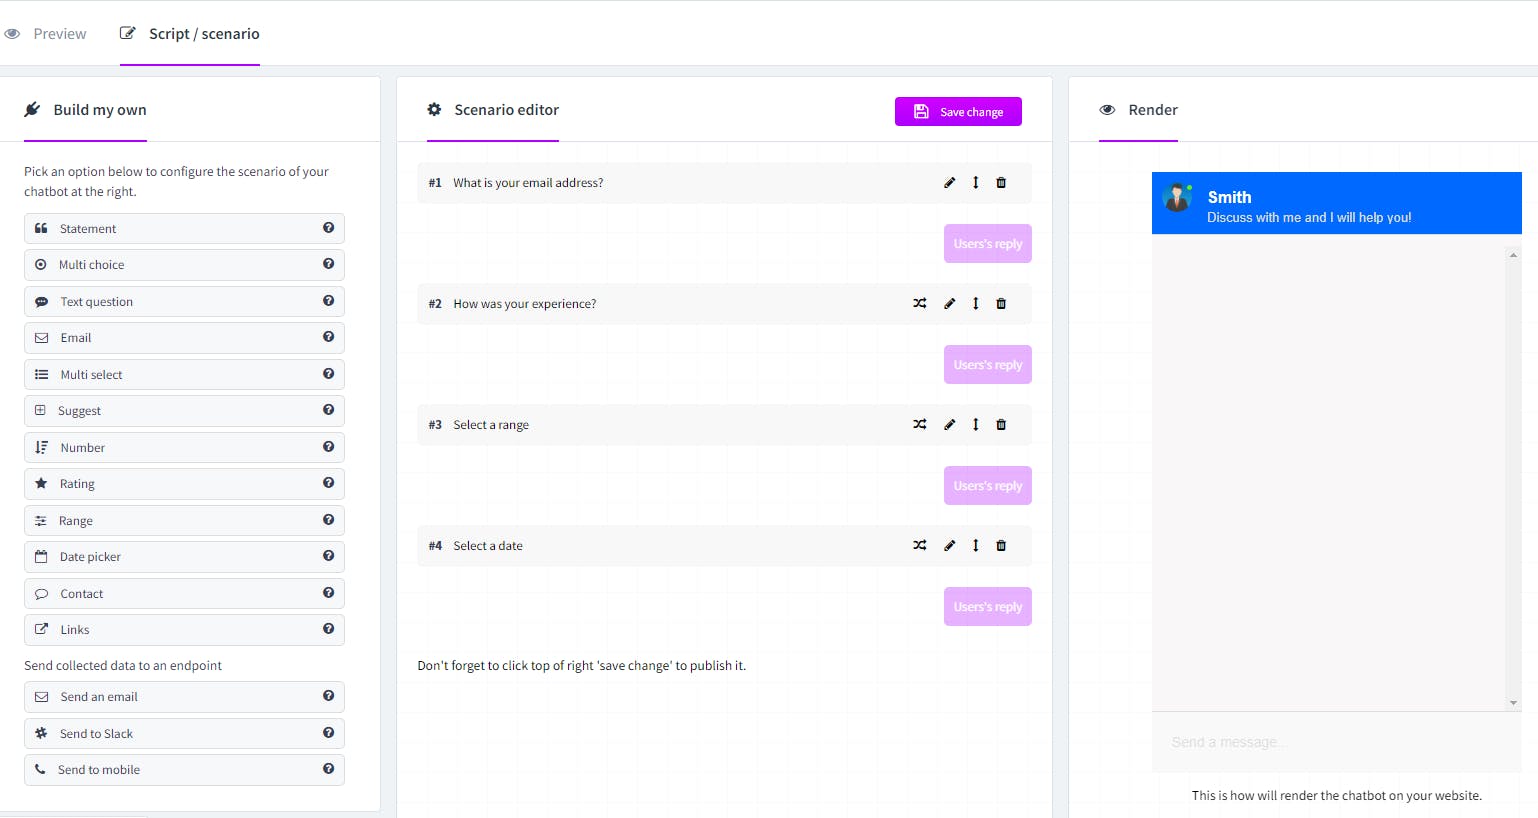
Select the "Script/scenario" to open the scenario builder.
Build your own tab consists of all the scenarios supported by us. It ranges from a wide range of statement texts to a range of selectors and actions of what happens after collecting the data — like sending them to an email, Slack channel, etc
The scenario editor lets you edit the entire chat flow. Each step comes with its own set of options — like connectors (exchange icon), edit, order, and delete icons seen in the image above.
When you Save changes you can see how it renders on your website and test it live. In the example screenshot above, you can see my test chat.
Note: When you edit the Scenario, you need to save those changes using Save Changes. If you don't save, your changes will not be published.
A little hint here is to use the connector option (exchange icon, 1st icon seen in the 1st step above) to create complex paths to engage with your visitors. You can work with If-then-like flows by using them as shown below.
Feel free to explore the settings to build your very own chatbot and engage with your website visitors automatically.
Next time new visitors find your website, you'll capture them on the fly. The same applies to existing leads in your campaigns, next time you send them to your websites you'll clarify their concerns using connectors and paths, easy!
To use all the powerful chatbot tools on your website, sign up today and start using Hatrio Sales with my invite for a free 14-day trial —> app.sales.hatrio.com/register?invite-code-3882